 The final stamp was produced the same way as the others, except two different images were used for the outer and inner background.
Tuesday, 12 January 2010
Panda stamp
The final stamp was produced the same way as the others, except two different images were used for the outer and inner background.Monday, 11 January 2010
Finishing touches
 I completed the panda by adding ears and a nose. These were created out of squashed spheres. The ears had fur added to them and the nose was coloured black with a cellular bitmap.

Sunday, 10 January 2010
And finally......................................
back to the panda.
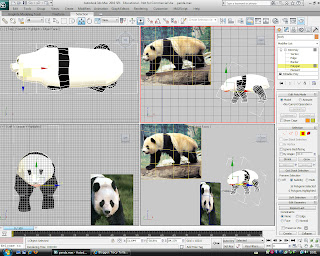

Using sub object mode I applied black and white material to the polygons. The eye area was inset then beveled inwards slightly and a sphere positioned in the socket and a black glossy texture with slight specularity applied. For the nose I extruded some polygons and split the edge of some polygons for the mouth. However on a quick render it shows that the head still needs a lot of work.


Thursday, 7 January 2010
stamp design
 Using the template of the fish design stamp in photoshop I replaced the background with the sky image and placed then final render in the centre.
bee and flower
 The material on the flower was completely redone as there were white marks along the edges of the petals, which altering the co-ordinates did not seem to be overly effective. I then moved the bee onto the flower. For the background I created a sky image in photoshop, made by filling it with a sky blue then using a large soft brush with an off white colour, lowered opacity and flow to craw out the clouds. This sky image was then mapped onto a plane using the material editor. Finally I added a spotligfht to the scene and after many faioed attempts eventually managed to place it so that the beee cast a shadow over the flower.
Tail end
 The individual polygons of the stripes were selected and an ID given to them. These were then coloured using a cellular bump map as I found this gave the best effect. The same dark material was added to the body and head sections. I then used the turbosmooth modifier before the hair and fur modifier. I found that by lowering the hair count and length it acheived a reasonable result. I then added the wings by cutting out the wings from an image in photoshop, creating a black and white outline of it and using the material editor to apply the images onto a plane, as in the leaf tutorial.
The antennae were created by cutting the top and bottom off a sphere then using the array tool to replicate it. The taper and bend modifiers were then applied before being copied and moved into place. Material was also added to the eyes, legs and antennae before being exported as an object and imported into the flower image.

Subscribe to:
Posts (Atom)